Elementor Form to CSV Plugin by Palak Bhatt | LastArcher.net

Transform Your Elementor Forms with Seamless CSV Integration – Download for Free!

Welcome to LastArcher.net, the home of innovative WordPress solutions crafted by Palak Bhatt. We are thrilled to introduce our latest creation, the Elementor Form to CSV Plugin, a powerful tool designed to effortlessly capture and store Elementor form submissions directly into a neatly organized CSV file. This plugin is an essential addition for website owners, developers, and digital marketers seeking to enhance their data collection processes without compromising on efficiency or usability.

Here is Sample Form

Why Choose Elementor Form to CSV Plugin?

  • Seamless Integration : Designed to work flawlessly with Elementor Pro, ensuring a smooth and reliable experience.
  • Automated Data Capture : Automatically captures every submission from your Elementor forms, adding a +91 prefix to phone numbers for Indian users, and stores them in an accessible CSV format.
  • Easy to Use : No complicated setup required. Install, activate, and watch as your form submissions are effortlessly organized.
  • Data Management Simplified : Say goodbye to manual data entry. Our plugin simplifies data collection, making it easier to manage, analyze, and utilize your valuable form submissions.
  • Secure & Reliable : Developed with security and performance in mind, ensuring your data is safely handled and stored.
  • Completely Free : Yes, you read it right. This powerful plugin is available for free, aligning with our commitment to giving back to the WordPress community.

Installation & Usage

Getting started with the Elementor Form to CSV Plugin is easy. Simply download the plugin from LastArcher.net, upload it to your WordPress site, and activate it. For detailed instructions and advanced configurations, visit our installation and user guide.

About the Developer

Palak Bhatt, the visionary behind LastArcher.net, is dedicated to developing WordPress solutions that empower website owners and developers. With a focus on simplicity, efficiency, and innovation, Palak’s plugins are designed to elevate your WordPress experience, ensuring your website stands out in the digital landscape.

Download & Support

Ready to streamline your data collection process? Download the Elementor Form to CSV Plugin for free today and experience the ease of managing form submissions like never before. For support, feature requests, or more information, please visit our website or contact us directly through LastArcher.net.

Join our growing community of WordPress enthusiasts and elevate your website with the Elementor Form to CSV Plugin. Your journey towards efficient and organized data management starts here!


When publishing this content, make sure to include relevant keywords throughout the page, such as “Elementor form to CSV,” “WordPress plugin,” “free Elementor plugin,” and “data management in WordPress.” Additionally, providing a FAQ section, user testimonials, and a clear call-to-action (CTA) can further enhance the page’s SEO and user engagement.

How to Use the Elementor Form to CSV Plugin

Transform your Elementor form submissions into easily manageable CSV files with just a few simple steps. Our Elementor Form to CSV Plugin, crafted by Palak Bhatt at LastArcher.net, is designed to automate the data collection process, ensuring no submission is ever missed. Here’s how to get started:

Step 1: Installation

  1. Download the Plugin: Visit LastArcher.net and download the Elementor Form to CSV Plugin.
  2. Upload to WordPress: Navigate to your WordPress dashboard, go to Plugins > Add New > Upload Plugin, and choose the file you just downloaded.
  3. Activate the Plugin: After uploading, click “Activate” to enable the plugin on your site.

Step 2: Configuration

No complex setup is required. The plugin automatically detects Elementor form submissions.

Step 3: Creating/Editing a Form

  1. Open Elementor Editor: Go to the page or post where your form is located (or where you want to add a new one) and click “Edit with Elementor.”
  2. Add/Edit Form Widget: Drag the Form widget to your desired location on the page or select an existing form to edit.
  3. Configure Your Form: Add or edit fields as necessary. If you’re using a phone number field and want the +91 prefix applied, ensure the field is correctly labeled or noted so the plugin can recognize it.

Step 4: Submission and CSV Generation

  • Form Submission: When users submit the form, the data is automatically captured by the plugin.
  • CSV File Location: The plugin stores all submissions in a CSV file within the 
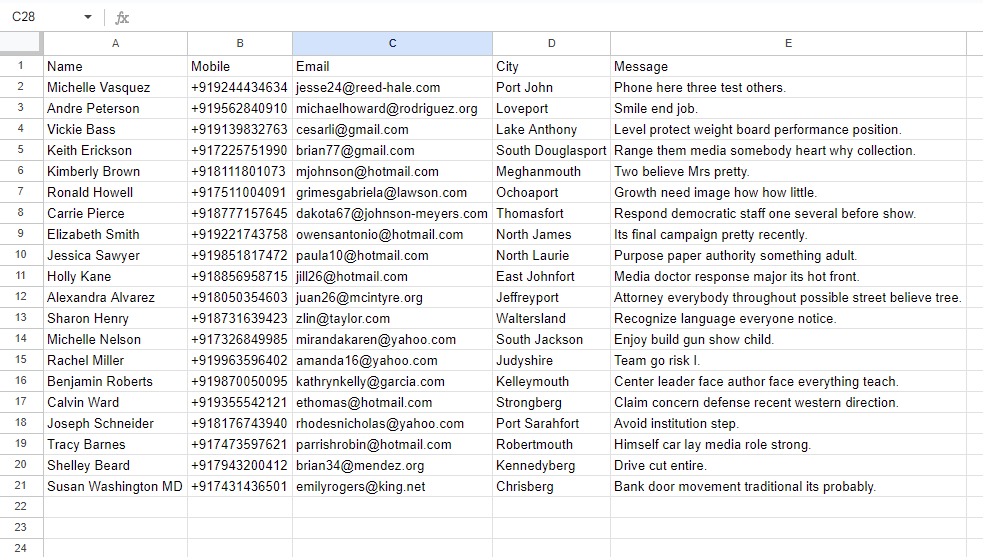
wp-content/uploads directory of your WordPress installation. The file is named elementor-form-submissions.csv.

Step 5: Accessing the CSV File

  • To access and download the CSV file, navigate to your WordPress site’s root directory via FTP or your web host’s file manager. Locate the wp-content/uploads folder, and you’ll find the elementor-form-submissions.csv file there.

Best Practices and Tips

  • Regularly Check CSV: Regularly download and review your CSV file to keep track of all submissions.
  • Backup: Always keep backups of your CSV files to prevent data loss.
  • Privacy Compliance: Ensure you comply with data protection regulations (like GDPR) when collecting and storing user data.

Troubleshooting

If you encounter any issues or the CSV file isn’t being updated, ensure:

  • Your WordPress installation and Elementor plugin are up to date.
  • The plugin is activated and your server has write permissions to the wp-content/uploads directory.
  • You’ve correctly identified the phone number field in your Elementor form.

For additional support, visit LastArcher.net/support.

© 2022 Palak Bhatt. All rights reserved.